Friday, 6 December 2013

Hair Bibliography


[Viewed 7th of October]

  [Viewed 7th of October]


http://i.walmartimages.com/i/p/00/03/77/32/07/0003773207029_500X500.jpg            [Viewed 13th of October]


[Viewed Sunday 27th of October]

Things I've learned about the Elizabethan Era


What I’ve learned about the Elizabethan era:

Clothing:

·      It was known as the golden age.
·      Dresses and materials were regarded as social hierarchy.
·      Own social classes had their own colours like: the expensive ones were red, purple, white and black because they were expensive colours to dye on clothes.
·      Blue, green, orange and yellow were the cheaper colours and it didn’t matter too much if the clothing became faded over time.
·      When she was younger dresses were straight than as she became older they were puffier.
·      Men wore cossets and padded trousers.

Beauty and hair:

·      Women’s beauty signified delicacy and purity.
·      Wealthy figures were allowed to wear make up.
·      Elizabeth was considered beautiful by her pale skin and orange hair.
·      Ingredients used in cosmetics were: coal, ceruse and egg whites.
·      Ceruse- is a mixture of white lead and vinegar for white skin; this was applied on the face, neck and chest.
·      Ceruse was very dangerous and it could cause leas poisoning, pimples, dizziness and for your skin to burn and peel.
·      It was not natural beauty.
·      They had high thin eyebrows.
·      They had very pale skin, which they used the white lead for.
·      Smooth unblemished skin was very rare.
·      Elizabeth caught the pox at 28, which left her with scars; she disguised them by using lots of make up.
·      White past was applied first then egg glaze to smooth out any wrinkles.
·      Cochineal extract, which is crushed beetles, were used for lipsticks and is still used for lipsticks today.
·      To wash their face they would use lemon juice and honey.
·      Men sometimes said women would go to hell if they wore make up.
·      Male writers accused women of faking themselves to marry men.
·      Men also hated the white lead as they couldn’t see a women’s reaction if they were blushing.
·      Poor women did not have enough money, resources or cosmetics and would work outside which give them a tan, having a tan was considered attractive.
·      The lack of dental care they had as they would clean their teeth with honey and use sugar toothpicks, in the later stages of Elizabeth’s life her teeth were black.
·      Women bleached their hair golden like Elizabeth’s by using: saffron and oil, which would make an orangey yellow paste and celandine a yellow flower. They would then sit out in the sun and let the paste dry and dye their hair.
·      If women could not afford the ingredients they would use fake hair.
·      Elizabeth had over 80 wigs.
·      They plucked their front hairline for a bigger forehead as it was considered beautiful if you had no front hairline.

Portraiture:

·      Portraits were used to show her innocence and power they also included a lot of symbolism within them.
·      Her dad broke away from god by making the church protestant so she wanted to portray herself in her portraits as being loyal to the people.
·      Someone would paint her first then other artists will add to the painting.
·      A lot of the portraits would show her in a good light and if she didn’t like the painting she would get rid of it.

Practising My Final Hair Design

My Final Hair design

Final hair charts:


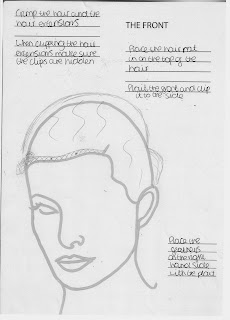
How to achieve it:


·      Crimp the hair and the hair extensions
·      Brush the crimp out
·      Clip in the orange hair extensions starting from the bottom up to the top
·      Section the hair in half
·      Section off the bottom half
·      Make sure you leave the front fringe section out
·      Place the hair rat in the top half, clipping it in
·      Then place the other hair rat in the bottom half going the opposite direction so the rat is on the top not underneath, clipping it in.
·      Plait the front going down till it joins up with the design
·      Place the feathers near the end of the plait, coming down on the face
·      Place sticker jewels on the plait


I slightly changed my design from the previous one by using another hair rat, once I tried the bun idea I did like it but it needed to be one overall bun shape to work and that would be quite difficult to achieve, so instead I used another hair rat to go at the bottom of the hair but being rolled the other way, This was way the designs were both separate from each other but still looked like one whole look. I also think the design is more noticeable this way as its better shaped and adds extra volume with the hair rats.

Wednesday, 4 December 2013

Practising Hair Designs

Practising hair designs

First hair charts:


First Design:


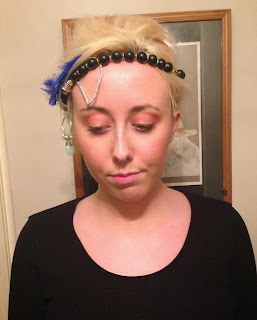
his was my first design I created, it was designed based around my Phillip Stubbes quote. I used orange hair extensions and began backcombing the hair and carefully brushing it down. I then created a bun which i flipped over to create the round shape. I used sliver thread to create the wires and entwined them with the black and gold necklace being used as a band. I then placed the blue feathers on the left hand side on top of the necklace band, I think the blue feathers give a good contrast of colour with the orange hair extensions. I then used a earring with pearls at the bottom for the big jewel. I tried to create the band with lace but It was difficult to sit properly and did not look as effective as the big beads. I used hair pins and grips.

Second hair charts:


Second design:


I have chosen this idea as I think it best fits in with the Elizabethan theme. The design gives it a period time element, whereas the colours in the hair gives it a contemporary vibe.
To create this look, I used orange hair extensions starting at the mid point of my hair, then working my way up to the top clipping them in making sure they’re secure and the clips are by my natural hair. 

I used a hair rat on top of the head placing it in with grips and hair pins. I also put my hair in a bun, teasing the back of the hair then placing my bun back onto itself to create a bob shape. Then I plaited the front clipping it in at the side. I placed feathers at the right side with my plait and flower design, then I put sticker jewels on to my plait. I had my hair crimped and would like my hair extensions to be crimped also.

think the feathers on the side work really well with this hair style.
I tried to combine my hair extensions into the design to create streaks rather than full colour hair. It was difficult trying to get the shape in the right way, I used different methods but this one worked the best. I used hair pins, grips and sticker jewels on my plait design.

Third hair charts:


Third design:


This is my third design which was inspired by the Elizabethan roll look. I used a hair rat to create the roll shape. I wanted to try different ways of this look, one way was rolling the hair backwards and another rolling it front ways. I think front ways looks more effective as it gives a bigger design and shows the orange hair extensions more. I created a plait with my hair and ribbon with bows either side. I liked this design and the way the tights shaped my hair. I left the bottom of my hair and fringe down to give it a more contemporary look, however it was quite difficult pinning the rolls onto my hair at the back as I couldn'tt see very well. I used hair pins and grips.

Final Look


Week 9- Final hair design look

Consultation:

Name: Danika Sandhu

Age: 19

Hair type, colour, natural or dyed?

Naturally wavy, long, dark brown (dyed).

Skin type?

Combination.

Skin tone?

Tanned.

Eye colour/ Shape?

Brown, small lid/ large brow.

Allergies/ Medication?

None.

Contraindication?

None.

Equipment used: Hair rat, grips, curvy pins and ribbon.

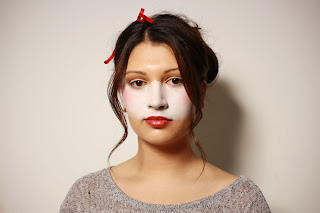
This is my final look:


 The hair design was already pre curled so I placed it in a hair rat with the curls coming from behind to the top. I then let the curls at the front come down and placed a red ribbon at the front of the design. After looking at my practise design and how she created it I made the hair rat look more rolled than high and sectioned the hair much better. If I were to do this again I would sweep the hair over the rat better by moving the hair once it was in its style, teasing it with a hairpin then placing it in.

Self evaluation:

My Initial reactions to the design were that it is very quirky and different from any Elizabethan design I had seen but understood the concept of the ‘Contemporary Elizabethan’ by the white base against the normal skin tone which shows a contrast between the Elizabethan era and the era we live in today. I liked on the hair design the use of a hair rat and the ribbon that would be used as an extra accessory.

My main corners for the hair design was that I wasn’t sure if curling the hair on the day would be right as it can take up a long time. The main concerns were for me on the make up was how I would get the base right.

The techniques I learnt while practicing this design were how to make something different on the base stand out more by using extra colour and making sure you buff in the product so the application looks refined, I also learned about making lines on the face against the normal colours by clearly showing the difference between the white and normal base.

Other techniques I have learnt are how to shape the lips and to angle your lip brush in a certain way to follow the line and draw extra attention against the skin. With the hair I learned how to use a hair rat and sectioning the hair when putting the hair from the back forward, I also learned how to disguise the hair rat when placing it into a roll shape and making sure the grips and pins were disguised too.

What I would improve for next time would be for the hair rat to be more secured and for the hair to be looking naturally swept over the rat. For the make up I would make the eyelashes look bigger by using more mascara.